PS C:\Source\GitRepos\SwaggerAndHealthCheckBlog> tye deploy --interactive
Loading Application Details...
Verifying kubectl installation...
Drats! 'deploy' failed:  Cannot apply manifests because kubectl is not installed.
```  ```
C:\WINDOWS\system32>choco install kubernetes-cli
Chocolatey v0.10.15
Installing the following packages:
kubernetes-cli
By installing you accept licenses for the packages.
Progress: Downloading kubernetes-cli 1.20.2... 100%  kubernetes-cli v1.20.2 [Approved]
kubernetes-cli package files install completed. Performing other installation steps.
The package kubernetes-cli wants to run 'chocolateyInstall.ps1'.
Note: If you don't run this script, the installation will fail.
Note: To confirm automatically next time, use '-y' or consider:
choco feature enable -n allowGlobalConfirmation
Do you want to run the script?([Y]es[A]ll - yes to all[N]o[P]rint): y  Extracting 64-bit C:\ProgramData\chocolatey\lib\kubernetes-cli\tools\kubernetes-client-windows-amd64.tar.gz to C:\ProgramData\chocolatey\lib\kubernetes-cli\tools...
C:\ProgramData\chocolatey\lib\kubernetes-cli\tools
Extracting 64-bit C:\ProgramData\chocolatey\lib\kubernetes-cli\tools\kubernetes-client-windows-amd64.tar to C:\ProgramData\chocolatey\lib\kubernetes-cli\tools...
C:\ProgramData\chocolatey\lib\kubernetes-cli\tools  ShimGen has successfully created a shim for kubectl.exe  The install of kubernetes-cli was successful.  Software installed to 'C:\ProgramData\chocolatey\lib\kubernetes-cli\tools'  Chocolatey installed 11 packages.  See the log for details (C:\ProgramData\chocolatey\logs\chocolatey.log).  C:\WINDOWS\system32>cd C:\Source\GitRepos\SwaggerAndHealthCheckBlog  C:\Source\GitRepos\SwaggerAndHealthCheckBlog>tye deploy --interactive
Loading Application Details...
Verifying kubectl installation...
Drats! 'deploy' failed:  Cannot apply manifests because kubectl is not installed.  C:\Source\GitRepos\SwaggerAndHealthCheckBlog>kubectl version --client
Client Version: version.Info\\{Major:"1", Minor:"20", GitVersion:"v1.20.2", GitCommit:"faecb196815e248d3ecfb03c680a4507229c2a56", GitTreeState:"clean", BuildDate:"2021-01-13T13:28:09Z", GoVersion:"go1.15.5", Compiler:"gc", Platform:"windowsamd64"\}  C:\Source\GitRepos\SwaggerAndHealthCheckBlog>cd %USERPROFILE%  C:\Users\mburton>mkdir .kube  C:\Users\mburton>cd .kube  C:\Users\mburton\.kube>New-Item config -type file
'New-Item' is not recognized as an internal or external command,
operable program or batch file.  C:\Users\mburton\.kube>pwsh  PowerShell 7.0.3  Copyright (c) Microsoft Corporation. All rights reserved.  https:/aka.mspowershell  Type 'help' to get help.  A new PowerShell stable release is available: v7.1.0  Upgrade now, or check out the release page at:  https:/aka.msPowerShell-Release?tag=v7.1.0  PS C:\Users\mburton\.kube> New-Item config -type file  Directory: C:\Users\mburton\.kube  Mode  LastWriteTime  Length Name
----  -------------  ------ ----
-a---  07022021  00:36  0 config  PS C:\Users\mburton\.kube> cd C:\Source\GitRepos\SwaggerAndHealthCheckBlog\
PS C:\Source\GitRepos\SwaggerAndHealthCheckBlog> tye deploy --interactive
Loading Application Details...
Verifying kubectl installation...
Drats! 'deploy' failed:  Cannot apply manifests because kubectl is not installed.
PS C:\Source\GitRepos\SwaggerAndHealthCheckBlog> Install-Script -Name 'install-kubectl' -Scope CurrentUser -Force
PS C:\Source\GitRepos\SwaggerAndHealthCheckBlog> install-kubectl.ps1 c:\kubectl
==>Getting download link from  https:/kubernetes.iodocstaskstoolsinstall-kubectl/
==>analyzing Downloadlink
==>starting Download from https:/dl.k8s.ioreleasev1.20.0binwindowsamd64kubectl.exe using Bitstransfer
==>starting 'c:\kubectl\kubectl.exe version'
Client Version: version.Info\\{Major:"1", Minor:"20", GitVersion:"v1.20.0", GitCommit:"af46c47ce925f4c4ad5cc8d1fca46c7b77d13b38", GitTreeState:"clean", BuildDate:"2020-12-08T17:59:43Z", GoVersion:"go1.15.5", Compiler:"gc", Platform:"windowsamd64"\}
Unable to connect to the server: dial tcp [::1]:8080: connectex: No connection could be made because the target machine actively refused it.  You can now start kubectl from c:\kubectl\kubectl.exe
copy your remote kubernetes cluster information to C:\Users\mburton\.kubeconfig  PS C:\Source\GitRepos\SwaggerAndHealthCheckBlog> tye deploy --interactive
Loading Application Details...
Verifying kubectl installation...
Drats! 'deploy' failed:  Cannot apply manifests because kubectl is not installed.
PS C:\Source\GitRepos\SwaggerAndHealthCheckBlog> kubectl
kubectl controls the Kubernetes cluster manager.  Find more information at: https:/kubernetes.iodocsreferencekubectloverview/
```  Tye picked random ports while the project app config already specified ports.
https:/github.comdotnettyeissues178


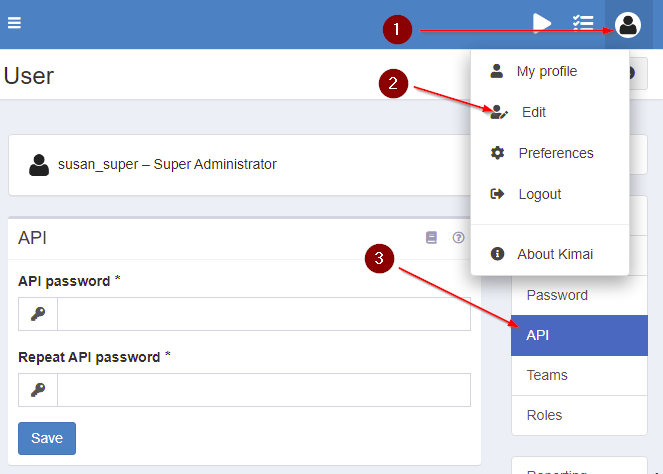 ## Set the API credentials in the Excel Add-in
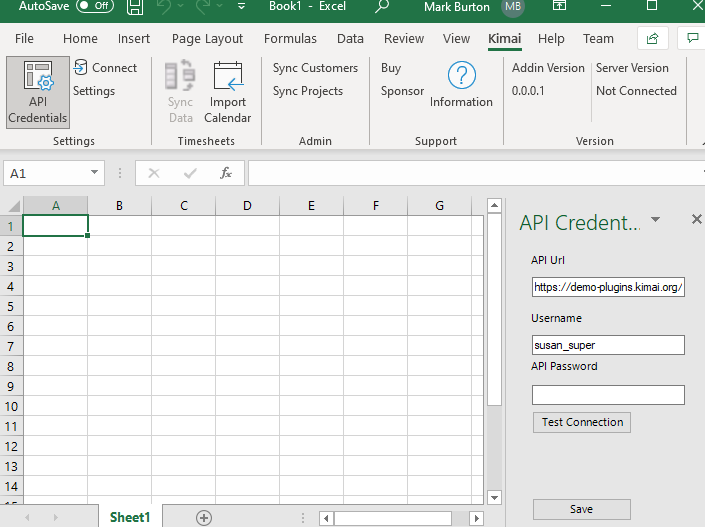 ## Save the API credentials to activate the sync
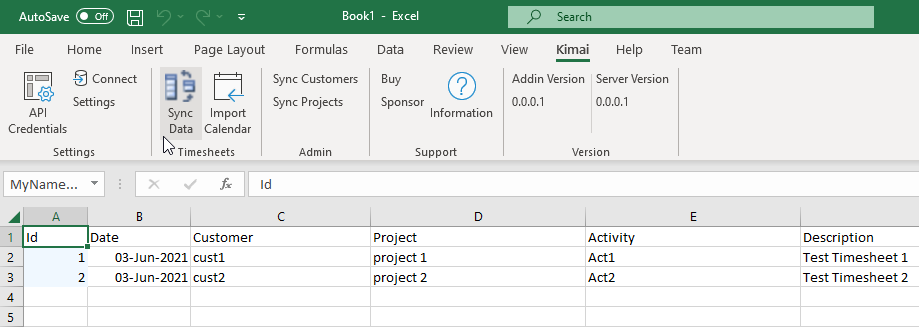 ## Usage of the Add-in
For now the Add-in only supports reading existing timesheets and adding new ones, and editing of timesheets will need to be done in Kimai. ## Questions and suggestions
The GitHub repo can be found at the
## Usage of the Add-in
For now the Add-in only supports reading existing timesheets and adding new ones, and editing of timesheets will need to be done in Kimai. ## Questions and suggestions
The GitHub repo can be found at the