Moving from Docker to Podman on WSL2

Introduction
In this post I share my real-world migration from Docker to Podman on Windows (WSL2), what worked, what I tripped over, and recommendations for team-friendly setups.
Long story short, i didn't stay on Podman, i prefered my docker setup, but now we have native support in wsl for containers I will soon try that approach.
Article outline
- My old Docker setup and why I liked it
- Why I wanted to switch to Podman
- My first attempt and frustrations with Podman Desktop
- Realisation about Podman Desktop, Rancher Desktop, and the extra WSL distro
- The options I considered and what I chose (comparison)
- Step-by-step setup (what worked for me)
- VS Code / Dev Containers and optional Podman in Ubuntu WSL2
- Docker compatibility, DOCKER_HOST, and FAQ
- Troubleshooting
- Migrating Docker images and containers
- Conclusion
Moving from Docker to Podman on WSL2: My Migration Story
Moving from Docker to Podman might seem daunting at first, but once I understood the architecture, the process was surprisingly straightforward. In this post, I’ll share my real-world migration journey, the problems I hit, the options I discovered, and the setup that finally worked for me (and my team).
My Old Docker Setup (and Why I Liked It)
Before I started with Podman, I had a Docker setup that worked brilliantly for my development workflow:
- Docker Engine running on Ubuntu in WSL2
- Docker CLI installed on Windows
- DOCKER_HOST environment variable configured so Windows commands routed to the Docker daemon in WSL2 (often set to
tcp://<WSL_IP>:2375) - VS Code with the Remote - WSL extension for development
This let me run docker commands from PowerShell or CMD, and they’d seamlessly execute against the Docker instance running in WSL2. The Linux environment in WSL2 also gave me better compatibility with container tooling and AI/ML frameworks.
I liked this setup because it worked smoothly with VS Code and Visual Studio tooling — I could run, build and debug containers from my usual IDEs without extra friction. Importantly, it avoided the need for a Docker Desktop licence, which can be a significant cost for teams that don't use Docker extensively in day-to-day development.
Why I Wanted to Switch to Podman
Several factors prompted me to switch to Podman:
- Daemonless architecture - Podman doesn't require a background daemon, reducing resource usage
- Rootless containers - Better security model out of the box
- Docker CLI compatibility - Most
dockercommands work withpodman(you can even alias them) - No licensing concerns - Podman is fully open source
- Better systemd integration - Useful for running containers as services
- Guidance from senior colleagues -
The Options I Considered (and What I Chose)
After researching best practices and considering team requirements (Visual Studio support, PowerShell access, GUI management), I discovered there are two main approaches:
Option 1: Podman Desktop + Podman Machine (Team-Friendly)
- I installed Podman for Windows via the official installer
- I used Podman Desktop for GUI management
- I set up a Podman Machine—a lightweight, dedicated WSL2 distribution for containers
- This gave me full integration with Visual Studio, VS Code, and PowerShell
This mirrors how Docker Desktop works and provided the smoothest experience for my team.
Option 2: Podman CLI in Ubuntu WSL2 Only (Linux-First)
- I installed Podman directly in my existing Ubuntu WSL2
- My containers lived in my development environment
- This worked great for my Linux-first workflows
- But: I had no easy Windows integration (Visual Studio, PowerShell wouldn’t work without extra configuration)
My recommendation: For most teams, go with Option 1. It’s cleaner, better supported, and works for everyone. If you also need Podman inside your Ubuntu WSL2 for specific workflows, you can install it there too—they’ll just be separate container environments.
How the Approaches Compare
I found I could mix and match these approaches. For example, I used Podman Desktop (with Docker compatibility for Windows tools) and also had a full Podman install in Ubuntu WSL2 (with DOCKER_HOST set for CLI use), without ever creating the Podman Machine WSL distro. In this context, "Podman CLI" means a full Podman installation in my main WSL2 distro, never running podman machine init.
After some research, I found this GitHub issue which described a similar problem. The suggested workaround was to install Podman directly rather than letting Podman Desktop handle it.
What I Discovered: Podman Desktop, Rancher Desktop, and the "Extra" WSL Distro
If you’ve used Rancher Desktop, Podman Desktop will feel very familiar. Both tools provide a GUI for managing containers and both create a dedicated WSL2 distribution ("Podman machine" or "rancher-desktop") to run containers. This was a shift from my old Docker-in-WSL approach, where I could run everything inside my main Ubuntu WSL2 distro and point Windows tools at it via DOCKER_HOST.
Key differences:
- Podman Desktop and Rancher Desktop both manage their own WSL2 distros, separate from my main Ubuntu. This isolated my container environment from my dev environment, which was good for consistency but meant another WSL distro to manage.
- Docker in WSL2 (old approach) let me run Docker directly in my main Ubuntu WSL2, with Windows tools connecting via
DOCKER_HOST. This was simple and direct, but required manual setup and could be fragile for teams.
If, like me, you dislike the extra WSL distro:
- You can skip Podman Desktop and Podman Machine entirely, and just install Podman directly in your Ubuntu WSL2 (see below for how I did this).
- This gave me a workflow almost identical to my old Docker-in-WSL setup: I ran Podman in Ubuntu, set
DOCKER_HOSTas needed, and used the CLI from both Ubuntu and Windows. - Caveats:
- Windows tools (Visual Studio, PowerShell, Podman Desktop) did NOT see my containers unless I manually exposed the Podman socket to Windows and set up
DOCKER_HOST. - This approach was great for my solo/Linux-first workflows, but could be fiddly for team setups or if you want seamless Windows integration.
- Windows tools (Visual Studio, PowerShell, Podman Desktop) did NOT see my containers unless I manually exposed the Podman socket to Windows and set up
- Better systemd integration - Useful for running containers as services
My First Attempt: Podman Desktop Frustrations
My first approach was to install Podman Desktop, the graphical management tool for Podman. During installation, it attempted to set up Podman but failed with an error suggesting that the Windows virtualisation feature wasn’t enabled.
This was puzzling—I actively use both Hyper-V and WSL2, so virtualisation was definitely enabled on my system.
After some research, I found this GitHub issue which described a similar problem. The suggested workaround was to install Podman directly rather than letting Podman Desktop handle it.
Note: DOCKER_HOST and TCP Sockets
With Docker in WSL2, it was common to set DOCKER_HOST to something like tcp://<WSL_IP>:2375 to expose the Docker daemon over TCP for Windows tools. Podman does not expose a TCP socket by default.
- Podman Machine/Podman Desktop (Windows): Uses a Windows named pipe (
npipe:////./pipe/docker_engine) for Docker compatibility. - Podman in Ubuntu WSL2: Uses a Unix socket (e.g.,
unix:/run/user/1000/podman/podman.sock). - If you need a TCP socket for Podman, you must manually configure and secure it (not recommended for most users due to security risks).
So, while the mechanism is similar (pointing Docker tools at the right socket), the default socket type and path are different for Podman.
FAQ: DOCKER_HOST, Podman, and Docker Compatibility
What is the role of DOCKER_HOST with Podman?
DOCKER_HOST is an environment variable originally used by Docker to tell Docker CLI tools where to find the Docker daemon (e.g., a Unix socket, TCP socket, or Windows named pipe). Podman implements a Docker-compatible API (sometimes called "Docker socket compatibility") so that Docker tools—including Visual Studio, Docker Compose, and the Docker CLI—can talk to Podman as if it were Docker. When you set DOCKER_HOST to point at a Podman socket, you are telling Docker-compatible tools to use Podman instead of Docker.
Is DOCKER_HOST native to Podman?
No—DOCKER_HOST is not a Podman-native variable. It is a Docker convention that Podman supports for compatibility. Podman itself does not require DOCKER_HOST for its own CLI; it uses its own default socket locations. But if you want Docker tools (or Windows tools expecting Docker) to talk to Podman, you set DOCKER_HOST to the Podman socket.
Can You Use Podman Like Old Docker-in-WSL?
Yes—I was able to install Podman directly in my Ubuntu WSL2 and use it almost exactly like I did with Docker. This meant:
- No extra WSL distro
- All containers/images lived in my main Ubuntu
- I could set up the Podman socket to listen on a TCP port or Unix socket, and point Windows tools at it via
DOCKER_HOST
But:
- This is not the officially supported way for Windows integration, and some tools (Visual Studio, Podman Desktop) may not work out of the box
- I had to manually manage socket permissions, firewall rules, and environment variables
- Team members may struggle to reproduce this setup unless you document every step
If you want to drop Podman Desktop and just use Podman in Ubuntu WSL2, here's what I did:
- Installed Podman in Ubuntu WSL2:
sudo apt update
sudo apt install -y podman
systemctl --user enable podman.socket
systemctl --user start podman.socket - Exposed the Podman socket to Windows:
- By default, the socket is at
unix:/run/user/$(id -u)/podman/podman.sock. - I used npiperelay to forward this socket to a Windows named pipe, mimicking Docker Desktop/Podman Machine behaviour.
- I set
DOCKER_HOSTin Windows to point to the forwarded socket.
- By default, the socket is at
- Used the CLI as before:
- From Ubuntu:
podmancommands worked as normal - From Windows:
dockerorpodmanCLI could connect ifDOCKER_HOSTwas set up
- From Ubuntu:
References:
Bottom line:
- For my solo developer and Linux-first workflow, running Podman in Ubuntu WSL2 was absolutely possible and avoided the extra WSL distro. For teams or if you want seamless Windows integration, Podman Machine (with or without Podman Desktop) is the path of least resistance.
Step 1: Install Podman Desktop
First, I installed Podman Desktop from the official website:
- I downloaded it from podman-desktop.io
- I ran the installer
- When prompted, I chose WSL2 as the machine provider
Alternatively, I could have used winget:
winget install RedHat.Podman-Desktop
Step 2: Install Podman for Windows
This was the critical step that I initially missed. Podman Desktop can try to install Podman for you, but if it fails (as it did for me due to issue #11791), I installed it directly:
- I downloaded the latest installer from GitHub releases (e.g.,
podman-5.7.1-setup.exe) - I ran the installer as Administrator
- I accepted the defaults (WSL2 provider)
- I restarted my terminal/PowerShell after installation
Or I could have used winget:
winget install RedHat.Podman
I verified the installation:
podman --version
Step 3: Create a Podman Machine
Important: DOCKER_HOST and Dual Docker/Podman Setups
If you previously set the DOCKER_HOST environment variable in Windows (to point to Docker in Ubuntu WSL2), you should unset or remove it for a clean Podman experience. Windows tools (Visual Studio, Podman Desktop, PowerShell) will automatically use the Docker-compatible API provided by Podman Machine at npipe:////./pipe/docker_engine.
If DOCKER_HOST is set in Windows:
- Visual Studio and other tools may connect to your Ubuntu Docker daemon instead of Podman Machine, causing confusion or unpredictable behaviour.
If you want to dual-run Docker in Ubuntu and Podman Machine:
- Only set
DOCKER_HOSTin your Ubuntu WSL2 environment for your own CLI use. - Leave
DOCKER_HOSTunset in Windows for team-wide consistency. - Visual Studio and Windows tools will use Podman Machine by default if
DOCKER_HOSTis not set.
Commands to Unset or Remove DOCKER_HOST
In Windows (PowerShell):
# Unset for current session
Remove-Item Env:DOCKER_HOST

# To remove from user environment variables permanently (option 1):
[Environment]::SetEnvironmentVariable("DOCKER_HOST", $null, "User")

# Or use setx (option 2):
setx DOCKER_HOST ""
setx DOCKER_HOST "" sets the variable to an empty string, which is effectively the same as removing it for most tools. You may need to restart your terminal or log out/in for changes to take effect.
**In Ubuntu WSL2 (bash):**

```bash
# Unset for current session
unset DOCKER_HOST

# To remove from .bashrc or .profile, edit and delete any line like:
# export DOCKER_HOST=...
At this point, I created the Podman Machine (the lightweight WSL2 distribution that would run my containers):
Option A: Via Podman Desktop (what I did)
- I opened Podman Desktop
- I saw Podman detected (not "Not Installed")
- I went to Settings → Resources
- In the Podman tile, I clicked Create new
- I configured my machine:
- Name:
podman-machine-default(or my preference) - CPUs: 2-4 (depending on my needs)
- Memory: 4GB minimum (8GB recommended for development)
- Disk size: 100GB (adjust as needed)
- Name:
- I clicked Create
Option B: Via Command Line
# Create and start a machine with default resources (uses WSL2 by default)
podman machine init --now
Example successful output:
Looking up Podman Machine image at quay.io/podman/machine-os:5.7 to create VM
Getting image source signatures
Copying blob a88eaedde7e2 done   |
Copying config 44136fa355 done   |
Writing manifest to image destination
a88eaedde7e2006df5c34894695ebd1d6beda57d92a4492a5a670ed20609cdf1
Extracting compressed file: podman-machine-default-amd64: done
Importing operating system into WSL (this may take a few minutes on a new WSL install)...
The operation completed successfully.
Configuring system...
Machine init complete
Starting machine "podman-machine-default"

This machine is currently configured in rootless mode. If your containers
require root permissions (e.g. ports < 1024), or if you run into compatibility
issues with non-podman clients, you can switch using the following command:

        podman machine set --rootful

API forwarding listening on: npipe:////./pipe/docker_engine

Docker API clients default to this address. You do not need to set DOCKER_HOST.
Machine "podman-machine-default" started successfully
At this point, I saw a running Podman machine in Podman Desktop, and the Docker-compatible API socket was available for Windows tools (Visual Studio, Docker CLI, etc.) at npipe:////./pipe/docker_engine.
Step 4: Verify Your Setup
I tested that everything was working from PowerShell:
# Check machine status
podman machine list

# Run a test container
podman run --rm hello-world
I saw output confirming the container ran successfully.
In Podman Desktop, I now saw:
- The Podman machine running (green status)
- The hello-world image in my Images list
- Access to Containers, Volumes, and other resources
Step 5: Configure Visual Studio Integration
For Visual Studio to use Podman instead of Docker, I needed to configure the Docker-compatible API:
-
I ensured my Podman machine was running:
podman machine start -
Visual Studio automatically detected the Podman socket. If not, I checked that the Windows named pipe existed:
# List Podman connections
podman system connection list -
In Visual Studio, I went to Tools → Options → Container Tools and verified the connection.
Podman provides a Docker-compatible API. Most Docker tooling (including Visual Studio's container tools) works seamlessly with Podman. You can even create a docker alias if needed.
Step 6: Set Up PowerShell Integration
With Podman for Windows installed, the podman command worked directly in PowerShell. To also support scripts that used docker, I did this:
# Add to your PowerShell profile ($PROFILE)
function docker { podman $args }
Or I created a persistent alias by adding a batch file to my PATH.
Step 7: Test Your Setup
I ran a comprehensive test:
# From PowerShell on Windows
podman run --rm hello-world
I saw output like this:
Resolved "hello-world" as an alias (/etc/containers/registries.conf.d/shortnames.conf)
Trying to pull docker.io/library/hello-world:latest...
Getting image source signatures
Copying blob 17eec7bbc9d7 done   |
Copying config 1b44b5a3e0 done   |
Writing manifest to image destination

Hello from Docker!
This message shows that your installation appears to be working correctly.
...
The hello-world image is from Docker Hub and its message references Docker. This is expected—Podman uses the same OCI container images. The fact that this runs confirmed Podman was working correctly for me.
I also tested an interactive container:
podman run -it --rm alpine sh
VS Code and Dev Containers
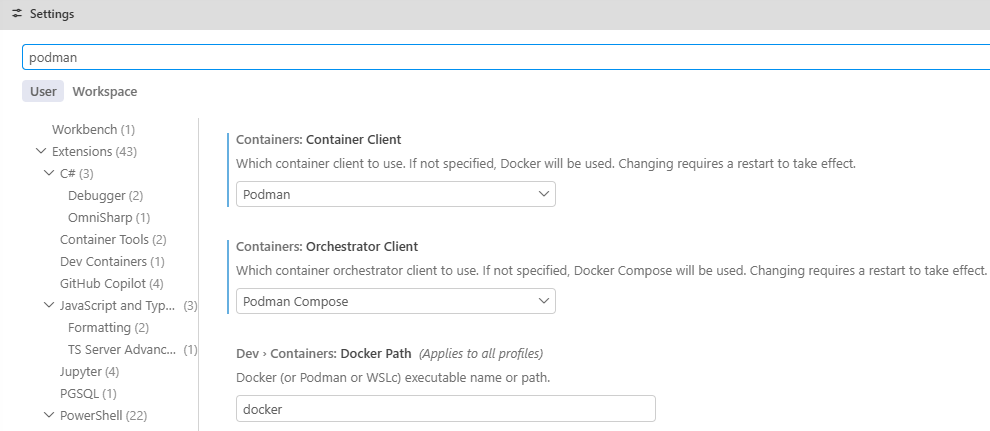
With Podman Machine running, VS Code's Dev Containers extension worked seamlessly for me:
- I installed the Dev Containers extension in VS Code
- I opened Command Palette → Dev Containers: Open Folder in Container
- VS Code used Podman automatically (it detected the Docker-compatible socket)
When I used VS Code Remote-WSL, I could still develop in my Ubuntu environment. When I needed containers, they ran in the Podman Machine. The Dev Containers extension worked from both Windows VS Code and Remote-WSL.
Note about choosing the provider in VS Code:
When you open a folder in a container via the Dev Containers extension you must explicitly select the provider (the dropdown shows Docker or Podman). If VS Code doesn't pick the provider you expect, choose Podman (or Docker) from that provider menu before continuing — this ensures Dev Containers targets the correct engine.
Optional: Podman in Ubuntu WSL2
If, like me, you also want to run Podman commands directly inside your Ubuntu WSL2 (separate from the Podman Machine), you can install it there too:
# In Ubuntu WSL2
sudo apt update
sudo apt install -y podman

# Enable the socket for local use
systemctl --user enable podman.socket
systemctl --user start podman.socket
If you install Podman in both places, understand that:
- Podman Machine: Used by Windows tools (Visual Studio, PowerShell, Podman Desktop)
- Ubuntu WSL2 Podman: Only accessible from within that Ubuntu session
Images and containers are not shared between them. For most teams, just using the Podman Machine is simpler, but I found it useful to have both for certain workflows.
Docker Compatibility
One of Podman's strengths is Docker compatibility. I found I could:
Alias docker to podman
# Add to your .bashrc or .zshrc
alias docker=podman
Use Docker Compose Files
Podman supports Docker Compose files via podman-compose:
# Install podman-compose
sudo apt install -y podman-compose

# Use it just like docker-compose
podman-compose up -d
Or I could use the built-in podman compose command (requires Podman 4.1+).
Troubleshooting
Podman Desktop Says "Not Installed" Even After Installing Podman
This usually meant Podman for Windows wasn't properly installed. What worked for me:
- I uninstalled any existing Podman installations
- I downloaded the installer directly from GitHub releases
- I ran as Administrator
- I restarted Podman Desktop
See GitHub issue #11791 for more details.
Short image names and registries.conf
If Podman refuses short image names such as dpage/pgadmin4:9 you'll see errors like:
Error: short-name "dpage/pgadmin4:9" did not resolve to an alias and no unqualified-search registries are defined in "/etc/containers/registries.conf"
exit code: 125
This happens because Podman won't assume docker.io (or another registry) for unqualified image names unless your /etc/containers/registries.conf defines unqualified-search-registries.
If you previously relied on Docker's defaults, you can add Docker Hub as an unqualified-search registry. On a Linux distro (Podman Machine or WSL), run as root:
sudo bash -c 'cat >> /etc/containers/registries.conf <<EOF
unqualified-search-registries = ["docker.io"]
EOF'
After updating, Podman will resolve short names like dpage/pgadmin4:9 against docker.io as expected. Alternatively, always use fully-qualified image names (e.g., docker.io/dpage/pgadmin4:9).
Also note: podman start will fail if the container was never created. You may see errors such as:
podman start -a deepwiki-postgres
Error: no container with name or ID "deepwiki-postgres" found: no such container
exit code: 125
Fix: create or run the container first (podman create / podman run) or check existing containers with podman ps -a.
Podman Machine Won't Start
# Check machine status
podman machine list

# Try stopping and starting
podman machine stop
podman machine start

# If still failing, I checked WSL status
wsl --list --verbose
Podman Machine WSL connectivity ("Cannot connect to Podman")
Sometimes podman info or other clients report that they cannot connect to Podman and suggest using podman machine init / podman machine start. Example diagnosis output I saw:
Cannot connect to Podman. Please verify your connection to the Linux system using `podman system connection list`, or try `podman machine init` and `podman machine start` to manage a new Linux VM
Error: unable to connect to Podman socket: Get "http://d/v5.7.1/libpod/_ping": ssh: rejected: connect failed (open failed)
In my case the podman machine init --now output appeared to succeed but the machine reported API forwarding failures:
API forwarding for Docker API clients is not available due to the following startup failures.
   could not start api proxy since expected pipe is not available: podman-machine-default

Podman clients are still able to connect.
Machine "podman-machine-default" started successfully
That means the WSL image created by the Podman Machine wouldn't accept connections from Windows (the named pipe or proxy wasn't available). This appears to be a known or transient issue with some Podman Machine image versions (for example, v5.7.x in my testing).
Workarounds and next steps:
- Try a different Podman Machine image/version or update Podman Desktop/Podman to a newer release.
- Run
podman system connection listto see available connections andpodman system connection inspect <name>to debug. - If the machine's API proxy fails, you can try
podman machine stopthenpodman machine rmand trypodman machine init --image <older-or-newer-tag> --now(if available). - If Podman Machine continues to refuse Windows connections, consider running Podman directly inside your main Ubuntu WSL2 distro (install Podman there and enable
podman.socket) as a reliable alternative for development. This bypasses the Podman Machine API proxy and avoids Windows <-> WSL pipe issues.
Example commands I used when switching to in-WSL Podman:
# In Ubuntu WSL2
sudo apt update
sudo apt install -y podman
systemctl --user enable podman.socket
systemctl --user start podman.socket
podman --version
For teams that require tight Windows integration (Visual Studio, Dev Containers), Podman Machine is still the path-of-least-resistance when it's working; when it isn't, the WSL approach is a practical fallback.
Visual Studio Can't Connect to Containers
What I checked:
- The Podman machine was running (
podman machine list) - The named pipe existed - checked in Podman Desktop → Settings → Resources
- I restarted Visual Studio after starting the Podman machine
Stale References to Old Tools (Rancher Desktop, etc.)
If Podman Desktop showed references to uninstalled tools:
- I went to Settings → Resources
- I looked for any invalid or disconnected providers
- I removed or ignored them - they didn't affect Podman functionality
WSL2 Networking Issues
If my containers couldn't access the network:
# Restart WSL
wsl --shutdown
# Then start Podman machine again
podman machine start
Migrating Docker Images and Containers
If, like me, you have existing Docker images you want to migrate:
# Export from Docker
docker save my-image:tag > my-image.tar

# Import to Podman
podman load < my-image.tar
Conclusion
Migrating from Docker to Podman on Windows turned out to be straightforward once I understood the architecture:
- I installed Podman Desktop - for GUI management
- I installed Podman for Windows - provided the CLI and Windows integration
- I created a Podman Machine - the lightweight WSL2 distro that runs containers
The key insight for me was that Podman Machine works similarly to Docker Desktop—it creates a dedicated Linux environment for containers, separate from my development WSL2 distributions. This provided the cleanest integration with Windows tools like Visual Studio and PowerShell.
For teams, this approach offers:
- ✅ Full Visual Studio container support
- ✅ PowerShell
podman(anddockeralias) commands - ✅ GUI management via Podman Desktop
- ✅ Docker Compose compatibility
- ✅ VS Code Dev Containers support
- ✅ No Docker Desktop licensing concerns
The initial installation hiccup I encountered (virtualisation feature error) was resolved by installing Podman directly rather than letting Podman Desktop handle it. Once that was done, everything worked smoothly for me.